Day 1
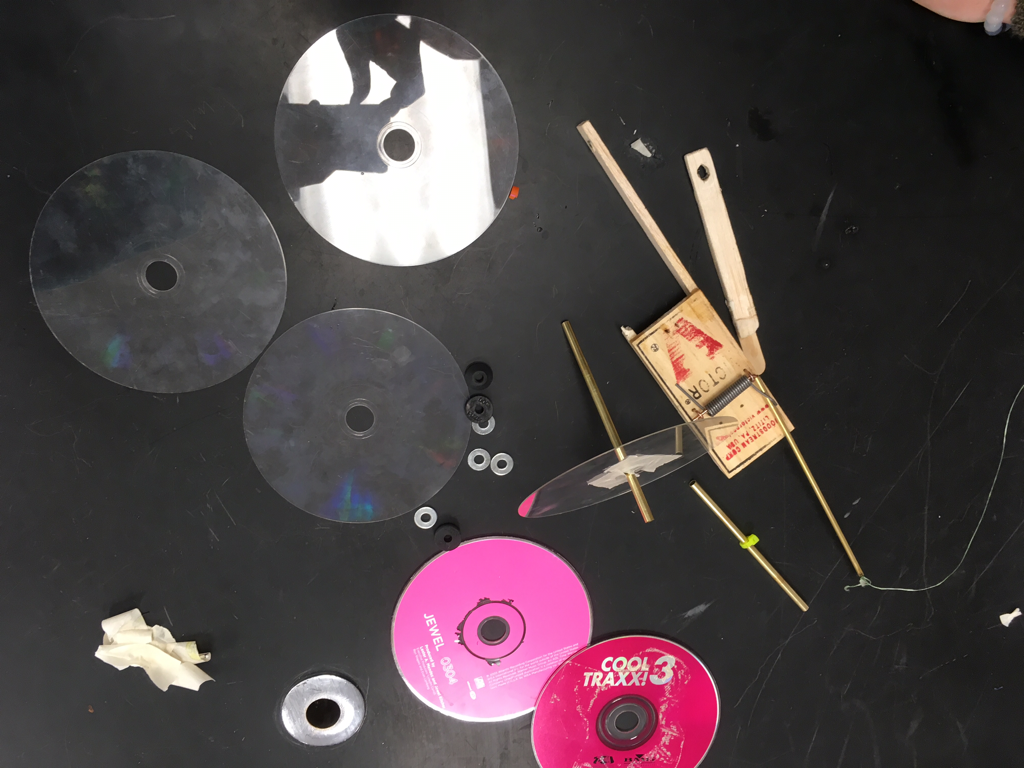
We started building the mousetrap car following the directions in the pictures shown below.
We started building the mousetrap car following the directions in the pictures shown below.
Day 2
We made a loop knot at one end of the string and then measured the string so it was just long enough to tie it to the locking bar loop.
We made a loop knot at one end of the string and then measured the string so it was just long enough to tie it to the locking bar loop.
Day 3
After finding that our wobbly wheels were the cause of our car not going in a straight line, we taped the plastic wheels to the black rubber spacers on both sides. As we tested our car, it would not go far so we had to fix the length of our string to make it tighter. As the car moved, there was friction between the car's wheels and the ground causing the car to go slower. We tightened the string so the car would have more engine force to overcome the friction.
After finding that our wobbly wheels were the cause of our car not going in a straight line, we taped the plastic wheels to the black rubber spacers on both sides. As we tested our car, it would not go far so we had to fix the length of our string to make it tighter. As the car moved, there was friction between the car's wheels and the ground causing the car to go slower. We tightened the string so the car would have more engine force to overcome the friction.

Day 4
We continued to test our car and adjust anything that was causing it to slow down or to not go straight. Our string was too short so we attached a new one. Then we applied more tape to the wheels, so they would become more sturdy.
We continued to test our car and adjust anything that was causing it to slow down or to not go straight. Our string was too short so we attached a new one. Then we applied more tape to the wheels, so they would become more sturdy.
Day 5
After finding that one of the wheels was cracked in the center, we replaced it with the same type and sized wheel. We then tested it only to find that the car kept turning right and going into the wall. We straightened the wheels again and continued to test it.
After finding that one of the wheels was cracked in the center, we replaced it with the same type and sized wheel. We then tested it only to find that the car kept turning right and going into the wall. We straightened the wheels again and continued to test it.
Day 6
One of the front wheels fell out of place on the car, but when we went to fix it we accidentally snapped one of the wooden side rails. We glued it back together and it didn't affect how the car worked. We started to run five trials on the car and we were able to finish three of them.
One of the front wheels fell out of place on the car, but when we went to fix it we accidentally snapped one of the wooden side rails. We glued it back together and it didn't affect how the car worked. We started to run five trials on the car and we were able to finish three of them.
Day 7
We continued to run the rest of the trials but we changed the direction when we first started the car. Since the car kept turning right, we started pointing the car the opposite way. This helped a lot because the car would start off going left but then start going right and not crashing into a wall. The last two trials were a great sucess.
We continued to run the rest of the trials but we changed the direction when we first started the car. Since the car kept turning right, we started pointing the car the opposite way. This helped a lot because the car would start off going left but then start going right and not crashing into a wall. The last two trials were a great sucess.
Data of the 5 trials
Trials |
Distance |
Angle |
Trial 1 |
43.65ft |
0 ft |
Trial 2 |
29.10ft |
4.3ft |
Trial 3 |
24.50ft |
12.6ft |
Trial 4 |
70.62ft |
7.4ft |
Trial 5 |
75.40ft |
2.11ft |
Day 8
We fixed and taped the wheels because everytime the car hit the wall the wheels would shift. We continued to run tests on our car.
We fixed and taped the wheels because everytime the car hit the wall the wheels would shift. We continued to run tests on our car.
Day 9
The wheels were sliding across the floor causing the car to flip over or stop short. We decided to put two heavier wheels on the back side of the mousetrap car. This helped the car to not flip over and stop but it made the car go slower than before.
The wheels were sliding across the floor causing the car to flip over or stop short. We decided to put two heavier wheels on the back side of the mousetrap car. This helped the car to not flip over and stop but it made the car go slower than before.
Day 10
We are trying different ways to make our car go faster. We rearranged the string and continued to test it.
We are trying different ways to make our car go faster. We rearranged the string and continued to test it.
Day 11
Our mousetrap car is working great and all our tests are going well. The car is passing the distance and the deviation is zero or close to zero. Although the speed is not very fast, these are the best trials we have had with the car so far.
Our mousetrap car is working great and all our tests are going well. The car is passing the distance and the deviation is zero or close to zero. Although the speed is not very fast, these are the best trials we have had with the car so far.
Day 12
Our mousetrap car was working pretty well. We figured that the car was going slower than before so we decided to change the back wheels from the sturdy cd's to the clear plastic ones. When attempting to put the wheels back on, one of the wooden rails snapped in half again. We couldn't glue it back together because we had already snapped it so many times. Our teacher gave us paint sticks to use for the wooden side rails and he also gave us a very strong glue to stick them on with. We were only able to glue on one of the side rails before the glue dried so we used superglue to glue the other side rail on.
Our mousetrap car was working pretty well. We figured that the car was going slower than before so we decided to change the back wheels from the sturdy cd's to the clear plastic ones. When attempting to put the wheels back on, one of the wooden rails snapped in half again. We couldn't glue it back together because we had already snapped it so many times. Our teacher gave us paint sticks to use for the wooden side rails and he also gave us a very strong glue to stick them on with. We were only able to glue on one of the side rails before the glue dried so we used superglue to glue the other side rail on.
Broken car
Day 14
Our side rails were now firmly glued on so we continued to rebuild our new mousetrap car. We attached the clear wheels and replaced the thick yellow string with some fishing wire. We made sure the wheels were as straight as possible before we taped the wheels to the black rubber spacers. We finished rebuilding the car and we tested it to see how it worked. The car worked pretty well and even went faster than before.
Our side rails were now firmly glued on so we continued to rebuild our new mousetrap car. We attached the clear wheels and replaced the thick yellow string with some fishing wire. We made sure the wheels were as straight as possible before we taped the wheels to the black rubber spacers. We finished rebuilding the car and we tested it to see how it worked. The car worked pretty well and even went faster than before.
Day 15
We tested the car again and found that it went in an almost straight line except towards the end when it turned left. We continued to work on it to make it go farther and straighter. We drew lines on a piece of paper to find the angle we needed to start our car off on. Also, we moved the front wheels further from the side of the car but we kept the back wheels the same. This made the car go in a straighter line than before. As we took videos of our runs we found that the car was crossing the line at seven or eight seconds each time.
We tested the car again and found that it went in an almost straight line except towards the end when it turned left. We continued to work on it to make it go farther and straighter. We drew lines on a piece of paper to find the angle we needed to start our car off on. Also, we moved the front wheels further from the side of the car but we kept the back wheels the same. This made the car go in a straighter line than before. As we took videos of our runs we found that the car was crossing the line at seven or eight seconds each time.
